
This tutorial describes how to automatize email send (after for example a form website compilation) with SilverPOP XML Api and php.
The first step is performed in SilverPop and requires the creation of a Silverpop database (that will store form information), and an autoresponder (based on a specific template).
First step: You login in Silverpop to create your database (single opt-in database)

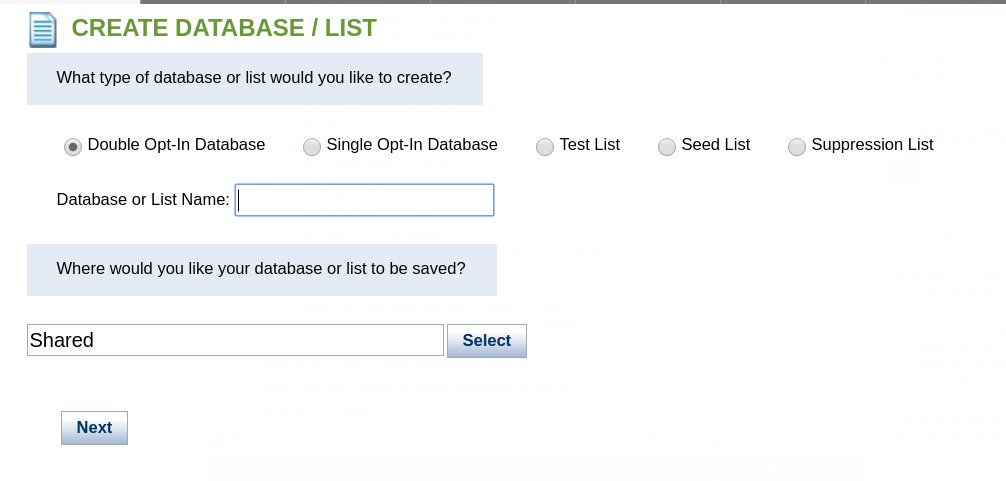
Then you can create your custom fields in the database (based on the form fields you have in your website).

In our example (above) we have created the additional fields: firstname, familyname, code.
Now we can create the template for the mail that will be automatically send to our website users (that will fill our form). Once the template is created you have to select Automate to create an automated message.
The Automated message will be sent every time a new user is added to your database (with the custom fields created).


Do not forget to:
- create a name for your automated message (Mailing Name)
- associate the automated message to your database (Custom Source)
- Select the option “Opt In” for Autoresponder setup


Once completed you can submit and create your automated message.
![]()
The database fields will be replaced inside your template for all the element created in the form of %%value%%. In our case we will include in our template
Dear %%firstname%% %%familyname%%
When the autoresponder will be automatically send, upon database user insertion, these fields will be replaced automatically.
Please keep in mind, Silverpop could inform you about any errors between database fields and your template after the automation created have been submitted (see screenshot below)

From the coding part (PHP) we will use again EngagePod API as described in our previous articles.
We need to login first and with the id of the database (you can find on SilverPop passing your mouse over the Database name) you can insert your entry based on the information received from the form (in our case firstname, familyname, code).
The example in the code below:
|
1 2 3 4 5 6 7 8 9 10 11 12 13 14 15 16 17 18 19 20 21 22 23 24 25 26 27 28 29 30 31 32 33 34 35 36 37 38 39 |
function login() { $silverpop = new EngagePod(array( 'username' => 'username', 'password' => 'password', 'engage_server' => 4 )); if ($silverpop) { $this->silverpop = $silverpop; return true; } else { return false; } if ($silverpop = login()) { $listId = 694425; // Database id $firstname = $_POST['firstname']; $familyname = $_POST['familyname']; $code = $_POST['code']; $email = $_POST['email']; try { $emailId = $silverpop->addContact( $listId, false, array( 'email' => $email, 'firstname' => $firstname, 'familyname' => $familyname, 'code' => $code ), false, true ); } catch (Exception $e) { echo 'error ' . $e->getMessage(); } } |